Accessible Home Design for Group Homes: Core Principles, Remodeling, and Safety Features

LBF Team • December 9, 2025

Group home inspections play a key role in keeping residents safe. They help create stable, supportive home settings that promote aging in place for people who need help with daily tasks, including those living with a disability, chronic conditions, or age-related mobility changes.


For these homes to truly support dignity and independence, the living environment has to work for the residents, not against them. Design choices move from being about looks to being about safety, comfort, and daily function. Thoughtful home modifications turn a standard house into a place where people can live with confidence.


Key Takeaways for aCCESSIBLE HOME DESIGN

  • Universal Design in group homes focuses on safe, easy-to-use spaces that support residents with different mobility, sensory, and cognitive needs.


  • Core interior design features include 60-inch turning circles, 42 to 48-inch-wide hallways, 36-inch-wide doors, reachable controls, and lower counters with knee clearance.


  • A phased remodeling plan, guided by an accessibility audit and staff and resident input, reduces disruption while targeting the most important safety and independence upgrades.


  • Exterior wheelchair ramps should follow a 1:12 slope ratio, include level landings, durable materials, and proper handrails and edge protection for safe entry and exit.


  • Interior grab bars, mounted into solid blocking and placed at common transfer points, greatly reduce fall risk in bathrooms, bedrooms, and shared living areas.


Modern accessible home design follows the ideas of Universal Design. This approach to accessible design plans spaces so they are easy to understand and use for everyone, whether a person walks, uses a wheelchair, has limited vision, or lives with cognitive challenges.


In a group home, every feature matters, including the floor plan. Each doorway, counter, hallway, and transition area, especially in an open floor plan, should help residents move, reach, and complete daily tasks with as little help as possible. This focus is especially important for people who use a wheelchair or scooter, or who have limited balance, strength, or dexterity.


Reaching this level of accessibility often means thoughtful remodeling and targeted home modifications. Projects like installing wheelchair ramps, grab bars, and adjustable counters make a very real difference in daily life. When planned carefully, these upgrades turn a group home into inclusive housing that provides a safe and functional home for everyone who lives there.

Are you looking for an expert resource in accessible spaces, special modifications for persons with mobility challenges, wheelchair accessibility, and more? Contact Lakeshore Barrier Free today.

Core Principles of Accessible Group Home Design

Accessible design grows from the philosophy of Universal Design. By thoughtfully planning the floor plan from the start, instead of making one-off fixes later, it accommodates a wide range of needs and abilities. In a group home, this means creating spaces that support residents, whether they are older adults, younger adults with a disability, or veterans returning home with new mobility needs.


A. Maneuvering Space and Turning Radius

Clear floor space in the floor plan is one of the first things to look at. Residents who use a wheelchair, power chair, or scooter need room to move, turn, and line up with doors, sinks, and furniture.


An open floor plan supports a common standard for a full turn: a clear circle of 60 inches (5 feet) in diameter. This turning space should be available in:

  • Kitchens
  • Bathrooms
  • Main living areas
  • Entry spaces


When this space is available, residents can move freely, adjust their position, and avoid scraping walls, bumping into furniture, or asking for constant assistance.


B. Hallway and Doorway Clearances

Hallways and doorways are major access points. If they are too narrow, even the best equipment or ramp will not help once someone is inside.

  • Many homes have 36-inch-wide hallways. For accessibility, wide circulation areas of 42 to 48 inches clear width work better.
  • Wider hallways allow two people to pass safely or a person in a wheelchair to move without hitting corners.


Wide doorways need similar attention:

  • Standard interior doors often give only 28 to 30 inches of clear opening.
  • Most wheelchairs require at least 32 inches of clear width.
  • In practice, this usually means installing a 36-inch door frame.


Door hardware is just as important as width. Lever-style handles are a better choice than round knobs. A lever can be used with a closed fist, forearm, or elbow, which helps people with arthritis, limited grip strength, or hand injuries.


C. Reach Ranges and Control Placement

Control placement has a big impact on independence. Light switches, thermostats, security keypads, and electrical outlets should be placed so both seated and standing users can reach them without strain.


A common reach range is:

  • Lower limit: 15 inches above the finished floor
  • Upper limit: 48 inches above the finished floor


Keeping switches and controls within this band reduces unsafe stretching, bending, or twisting. It also supports people who use mobility aids or have trouble raising their arms.

Bathroom with a light countertop, white cabinets, wood-look floor, and accessible sink area with a grab bar.

D. Counter Heights and Knee Clearance

Kitchens and accessible bathrooms are the heart of daily life. For many residents, these are also the rooms that create the most barriers.


Key design features include:

  • Lowering counters to about 34 inches instead of the standard 36 inches
  • Providing knee and toe clearance under sinks and work surfaces
  • Leaving space for a wheelchair to roll in close and stay stable


With these changes, residents can wash dishes, prepare meals, or brush their teeth from a seated position. Everyday tasks become safer and less tiring, and staff do not have to step in for every small task.


Together, these design basics change the layout from an obstacle course into a supportive structure that matches residents’ real needs.


Strategic Group Home Remodeling

Remodeling a group home is more complex than updating a single-family house. There are multiple residents, support staff, and often medical or therapy providers to consider. Many residents cannot simply move out during the work, so planning matters.


A successful project starts with a clear assessment, strong communication, and a step-by-step plan that keeps disruption as low as possible.


A. Conducting an Initial Accessibility Audit

The first step is a detailed accessibility audit incorporating ADA home design. This is often done by:

  • An occupational therapist
  • A certified accessibility specialist
  • An experienced home accessibility contractor


The audit identifies physical barriers and safety risks, then ranks them by impact and urgency. High-priority areas usually include:

  • Entrances and exits
  • Bathrooms
  • Kitchens
  • Key circulation paths


If most residents use a wheelchair or walker, then adding a lift, installing a permanent wheelchair ramp, or widening tight doorways may come first. If residents live with cognitive or memory-related disability, then clear signage, strong lighting, and simple, predictable layouts may be more urgent.


For homeowners and veterans living in group settings or shared homes, this kind of audit helps target the most important home modifications while staying within a set budget.


B. Phased Implementation and Reducing Disruption

Most group homes cannot shut down for construction. Work often needs to happen in phases so residents stay safe and comfortable.


A phased approach might include:

  • Remodeling one bathroom at a time
  • Reworking half the kitchen while leaving key appliances in place
  • Completing ramp and entry work before interior changes


During each phase, contractors and staff should agree on:

  • Work hours
  • Access points
  • Temporary routes and clear signage
  • Noise and dust control measures


Clear communication reduces stress. When residents and staff know when and where work will happen, they can plan care routines, appointments, and rest times.


C. Structural and System Upgrades

Some accessibility upgrades are simple, like swapping hardware or adding grab bars to existing blocking. Others affect the structure and require more planning, such as developing accessible home plans.


Larger projects can include:

  • Cutting or reframing walls to widen doors
  • Adding through-floor lifts or small residential elevators
  • Rebuilding stairways with proper handrails and landings
  • Reinforcing floors for heavy medical or lift equipment


Before this type of work starts, a structural engineer or qualified contractor should verify that the changes meet ADA codes, design standards, and safety standards. In many group homes, electrical systems also need upgrades to support power chairs, medical devices, lift systems, or smart-home safety features.


D. The Value of Staff and Resident Input

The people who live and work in the group home see what works and what does not every day. Their feedback often leads to simple, effective solutions that plans alone might miss.


Staff and residents can help identify:

  • Where a small ramp or threshold strip would stop trips and stumbles
  • The best place for a medication cabinet or secure storage
  • Where wear and tear is highest on the flooring or walls
  • Which fixtures are hardest to use from a wheelchair


This type of input keeps the remodel grounded in real-life use, not just codes and drawings. The result is a home that supports care routines, mobility, and independence without wasting money on features no one needs.


Exterior view of a house with a deck featuring steps and a ramp. Brown deck boards and railings.

Key Exterior Feature: Wheelchair Ramp Design and Installation

For many residents, a safe wheelchair ramp is the difference between feeling trapped inside and being able to leave home freely. While zero-step entrances offer the ideal goal for barrier-free access, a properly built ramp supports everyday outings, medical appointments, and rapid exit in an emergency.


Some people need a permanent ramp. Others, such as short-term rehab patients or veterans recovering from surgery, might only need a temporary wheelchair ramp rental while they heal. In both cases, safe design and correct slope are non-negotiable.


A. The 1:12 Slope Ratio

The slope, or rise-to-run ratio, is the most important part of ramp design. For most permanent residential and group home ramps, the recommended slope is 1:12, ensuring ADA-compliant accessibility.


This means:

  • For every 1 inch of vertical rise, the ramp extends 12 inches horizontally.
  • A 30-inch rise from ground to door needs at least 30 feet of ramp.


This gentle slope allows many wheelchair users to move on their own, without tipping backward or needing someone to push hard from behind. It also helps people who use walkers or have balance concerns.


If the yard is too short, designers may use switchbacks or U-shaped turns to fit the required length in a compact space. These turns must still include level landings and enough width to turn safely.


B. Landings and Safety Platforms

Level landings at key points keep users safe and reduce fatigue.


Standard landing needs include:

  • A flat landing at the top and bottom of the ramp
  • Clear, level space at the entrance door so the door can open fully for seamless transitions
  • Enough room for a wheelchair to turn and clear the door swing


A common guideline is a 60-inch by 60-inch clear space at the top landing. This lets a wheelchair user open the door, roll through, and close it without backing into a slope.


For longer ramps, especially where the total rise is more than 30 inches, intermediate platforms are recommended. These level areas give users a place to rest, reset brakes, or pause if they feel tired or lightheaded.


C. Material Choices and Durability

The best ramp material depends on budget, weather, and how long the ramps will stay in place. Common options include:

  • Treated wood
  • Lower first cost
  • Needs regular sealing and inspection
  • Can get slick when wet or icy without a good non-slip surface


  • Aluminum modular ramps
  • High durability and corrosion resistance
  • Built-in non-slip surfaces
  • Can be adjusted, moved, or reconfigured as needs change
  • Well-suited for temporary or rental ramps


  • Concrete ramps
  • Very durable and stable
  • Low long-term maintenance
  • Higher initial cost and more permanent


For temporary wheelchair ramps, such as for short-term recovery, rental aluminum systems are often ideal. For long-term disability support and aging in place, a permanent wood or concrete ramp may make more sense.


D. Handrails, Edge Protection, and Code Compliance

Safety features around the ramp are as important as the ramp itself.


Best practices usually include:

  • Handrails on both sides for ramps with more than 6 inches of rise or 72 inches of run
  • Continuous rails that are easy to grip and follow along
  • Returns at rail ends so clothing or mobility devices do not catch
  • Edge protection, such as curbs or low guardrails, is used to prevent wheels from slipping off


Every ramp also needs to meet local building codes, ADA standards, and key design standards. Professional permitting, inspections, and proper documentation protect residents, staff, and property owners.


Accessible shower with grab bars and a seat, tiled walls and floor.

Key Interior Safety Feature: Grab Bar Installation

While exterior ramps support access to the home, interior grab bars support safe movement inside it. They are one of the most effective tools for fall prevention, especially in bathrooms and near beds or seating areas.


For many residents, the right bar in the right place can be the difference between an independent transfer and a serious fall.


A. Grab Bars as Fall Prevention Tools

Grab bars are designed to carry weight, not just hold towels. They give people a firm, secure handhold during:

  • Standing up or sitting down
  • Moving from a wheelchair to a toilet or a shower bench
  • Stepping in or out of a tub or shower
  • Regaining balance after a slip


In group homes, bar placement should match the way residents actually move, based on the floor plan. Every common transfer point is a potential location for a bar.


B. Strategic Placement in Toilet Areas

Toilet areas are a top priority. Standard layouts often include:

  • A horizontal bar on the side wall beside the toilet, used for lateral transfers
  • A horizontal bar on the rear wall to help with sitting and standing


Guidelines usually call for mounting these bars 33 to 36 inches above the finished floor. The exact height may be adjusted to match the residents’ average height and the seat height of the toilet or commode.


C. Grab Bars in Showers and Tubs

The accessible bathroom is where many falls happen, especially on wet surfaces. Supports in tub and shower areas promote safe bathing and transfers.


Common layouts include:

  • A vertical bar at the entrance of a roll-in shower for initial stability
  • A horizontal bar on the control wall to help while adjusting water and standing
  • A horizontal bar on the back wall for general support
  • In tub-shower units, horizontal bars along the long back wall and a vertical bar near the tub entry or roll-in shower threshold


When paired with a shower chair, a handheld shower head, and slip-resistant flooring, these features help residents bathe with less hands-on assistance.


D. Structural Mounting and Weight Capacity

These supports are not safe if they are not mounted correctly. They must support real loads, not just light touches.


Key mounting rules:

  • Weight rating of at least 250 to 300 pounds
  • Anchored into solid blocking, such as wood studs or installed plywood backer
  • Heavy-duty anchors are used only where solid blocking is present and are rated for the load


Simply screwing a bar into drywall is unsafe and creates a serious liability risk. Professional installers or experienced contractors should locate studs, add blocking when needed, and test each bar after installation.


E. Beyond Bathrooms: Non-Traditional Locations

These supports do not need to stay in the bathroom. Many residents benefit from added stability in other parts of the home.


Helpful locations may include:

  • Beside the bed, to help with turning, sitting up, and standing
  • Along long hallways, to offer rest points and balance support
  • Next to a favorite chair or recliner, to assist with standing
  • Near interior steps or single-level changes within the home


Even a short vertical bar beside a bed can boost independence in the morning and at night. For people who use a wheelchair, a well-placed bar can reduce the effort and risk of each transfer.


Frequently Asked Questions About Accessible Group Home Design


What are the main goals of accessible design in a group home?

Accessible design in a group home aims to support safety, independence, and dignity for residents with different abilities. It focuses on making the home easy to move through, simple to understand, and safe to use for people who walk, use wheelchairs or scooters, or live with vision or cognitive changes. By following Universal Design principles, the group home shifts from basic compliance toward spaces that match daily routines, reduce fall and injury risk, and limit how often residents need hands-on help from staff.


How much maneuvering space does a wheelchair user need inside a group home?

Most wheelchair users need a clear turning circle of about 60 inches, or 5 feet, in key areas. This space should be available in kitchens, bathrooms, main living rooms, and at entries so users can turn, line up with doors, and reach sinks or appliances without scraping walls or furniture. Wider hallways, in the 42 to 48-inch range, and 36-inch-wide doors with at least 32 inches of clear opening also help residents move more freely and reduce the chance of bumps, bottlenecks, and near falls.


What should an accessibility audit cover before remodeling a group home?

An accessibility audit should look at how residents and staff use every area, then flag barriers and safety risks. A qualified professional, such as an occupational therapist, certified accessibility specialist, or experienced contractor, usually reviews entrances and exits, bathrooms, kitchens, and main circulation paths first. The audit ranks changes by impact and urgency. For example, homes with many wheelchair users may focus on ramps, lifts, and wider doors, while homes with more cognitive or memory needs may focus on lighting, clear signage, and simple, predictable layouts that reduce confusion.


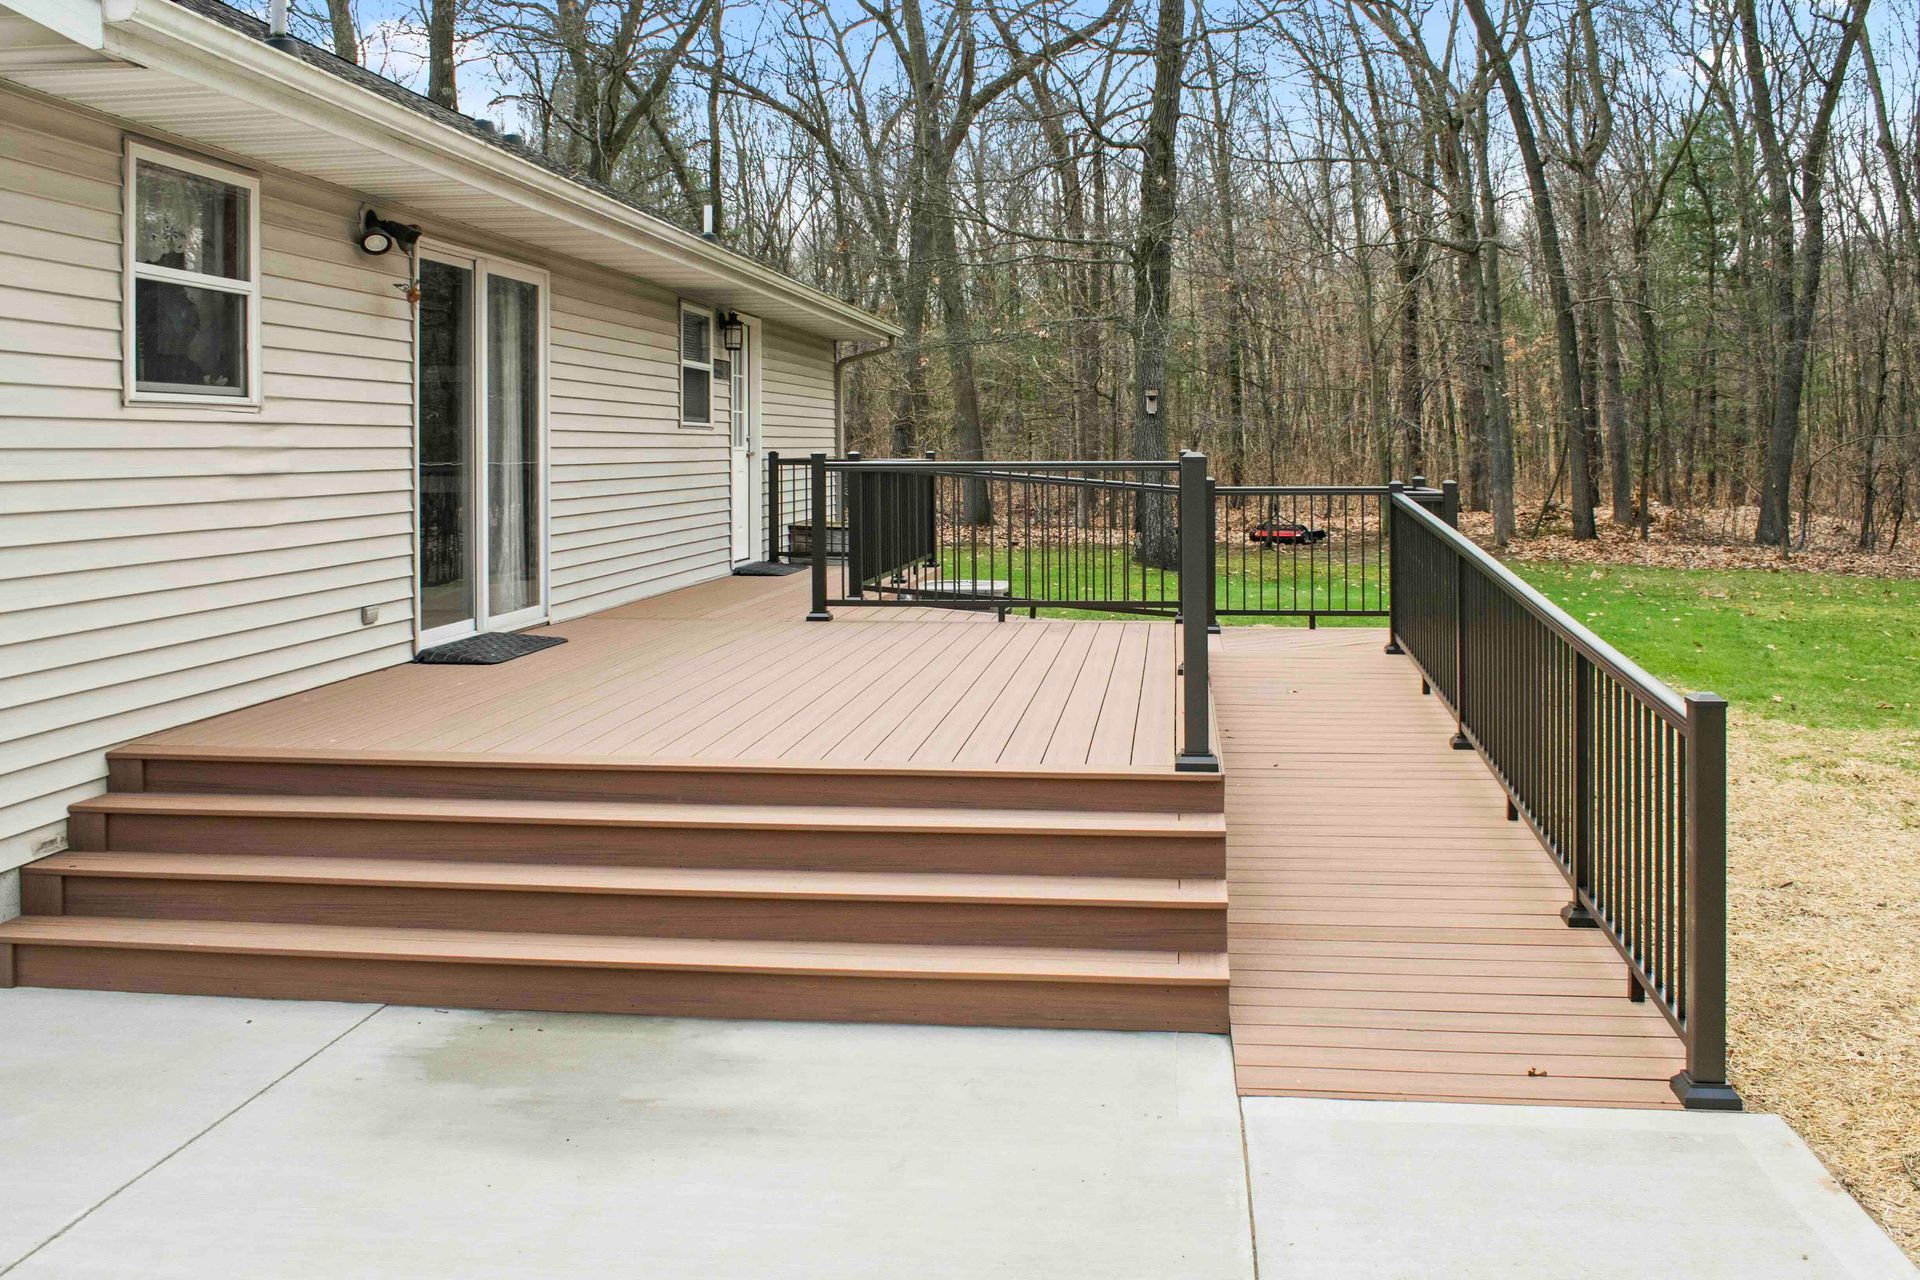
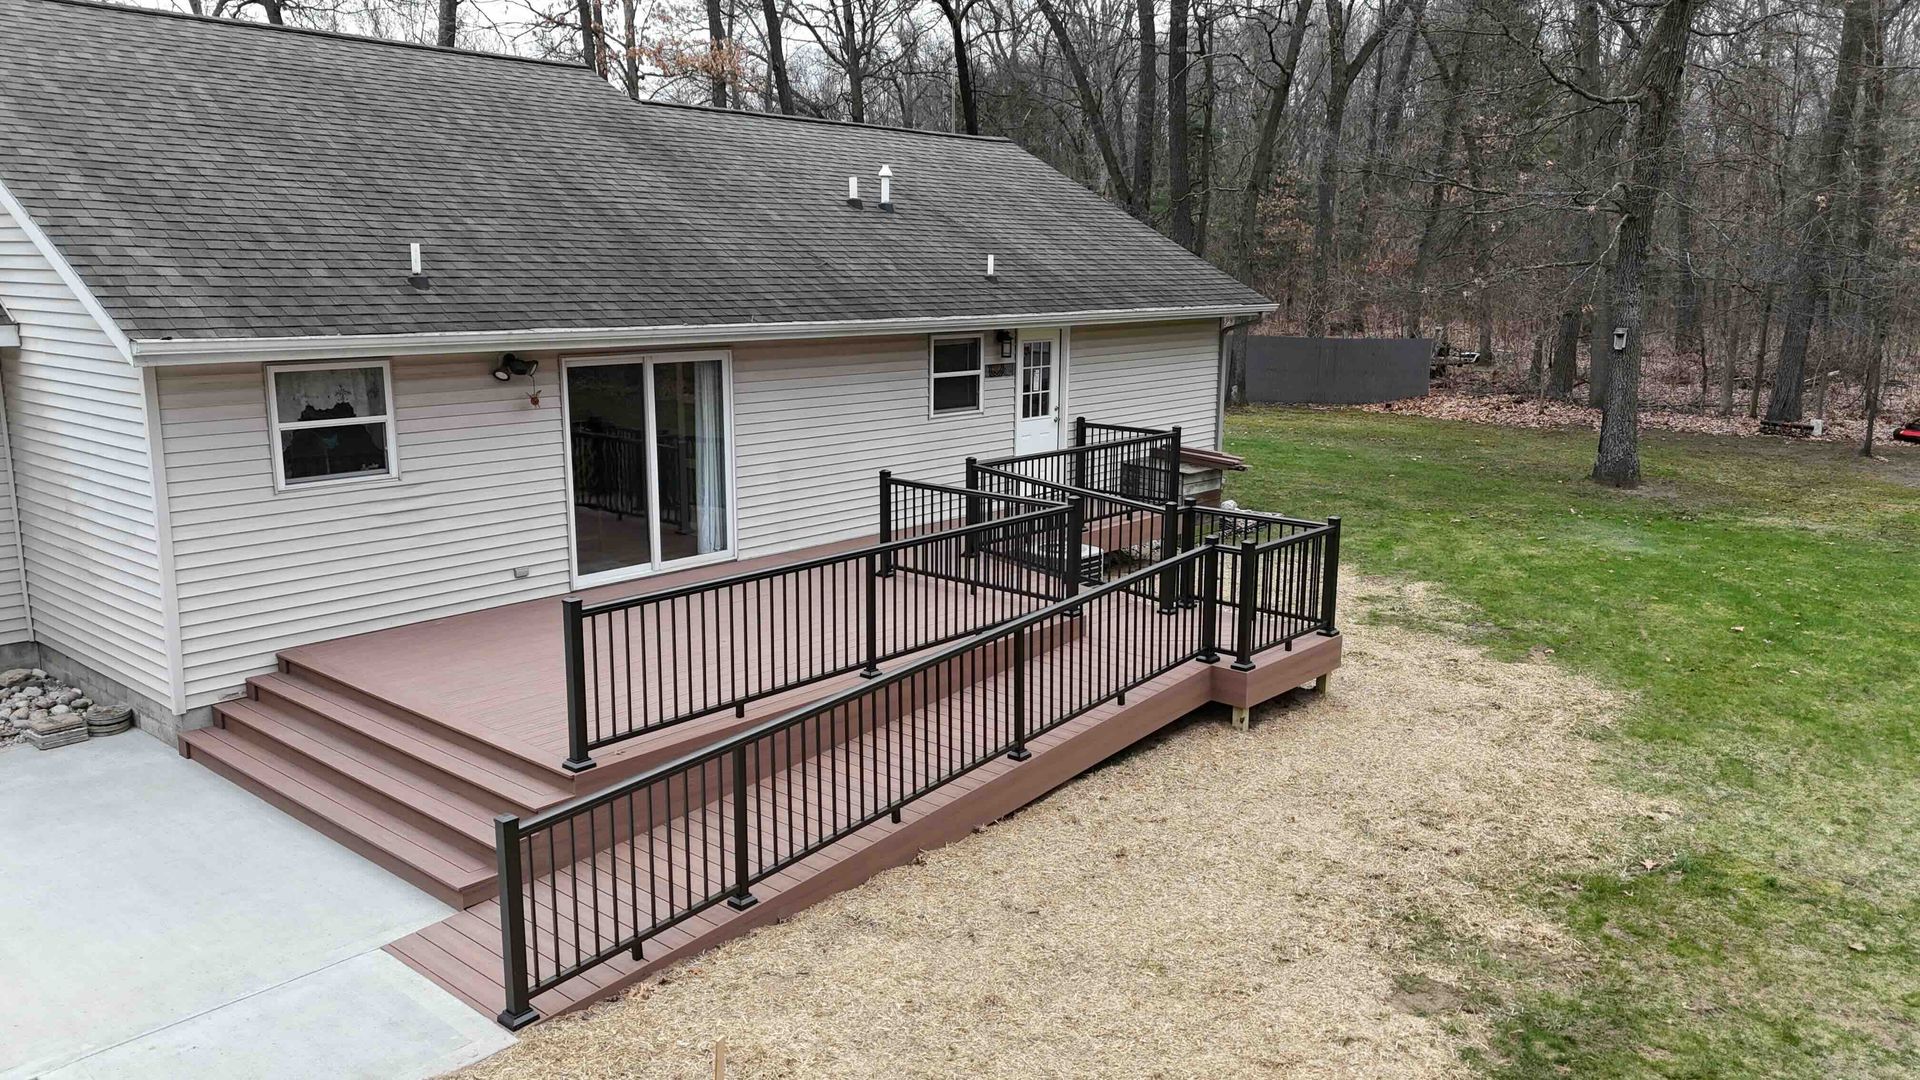
What makes a wheelchair ramp safe for group home residents?

A safe wheelchair ramp in a group home usually follows a 1:12 slope ratio, which means 1 inch of rise for every 12 inches of run. A 30-inch rise from ground to door, for example, needs at least 30 feet of ramp, often broken into sections with level landings. Ramps should include flat platforms at the top and bottom, plus rest landings for longer runs, with about a 60-inch by 60-inch clear space where people turn or manage the door. Durable materials, such as aluminum or concrete, non-slip surfaces, handrails on both sides, and edge protection all support safer everyday use and emergency exits.


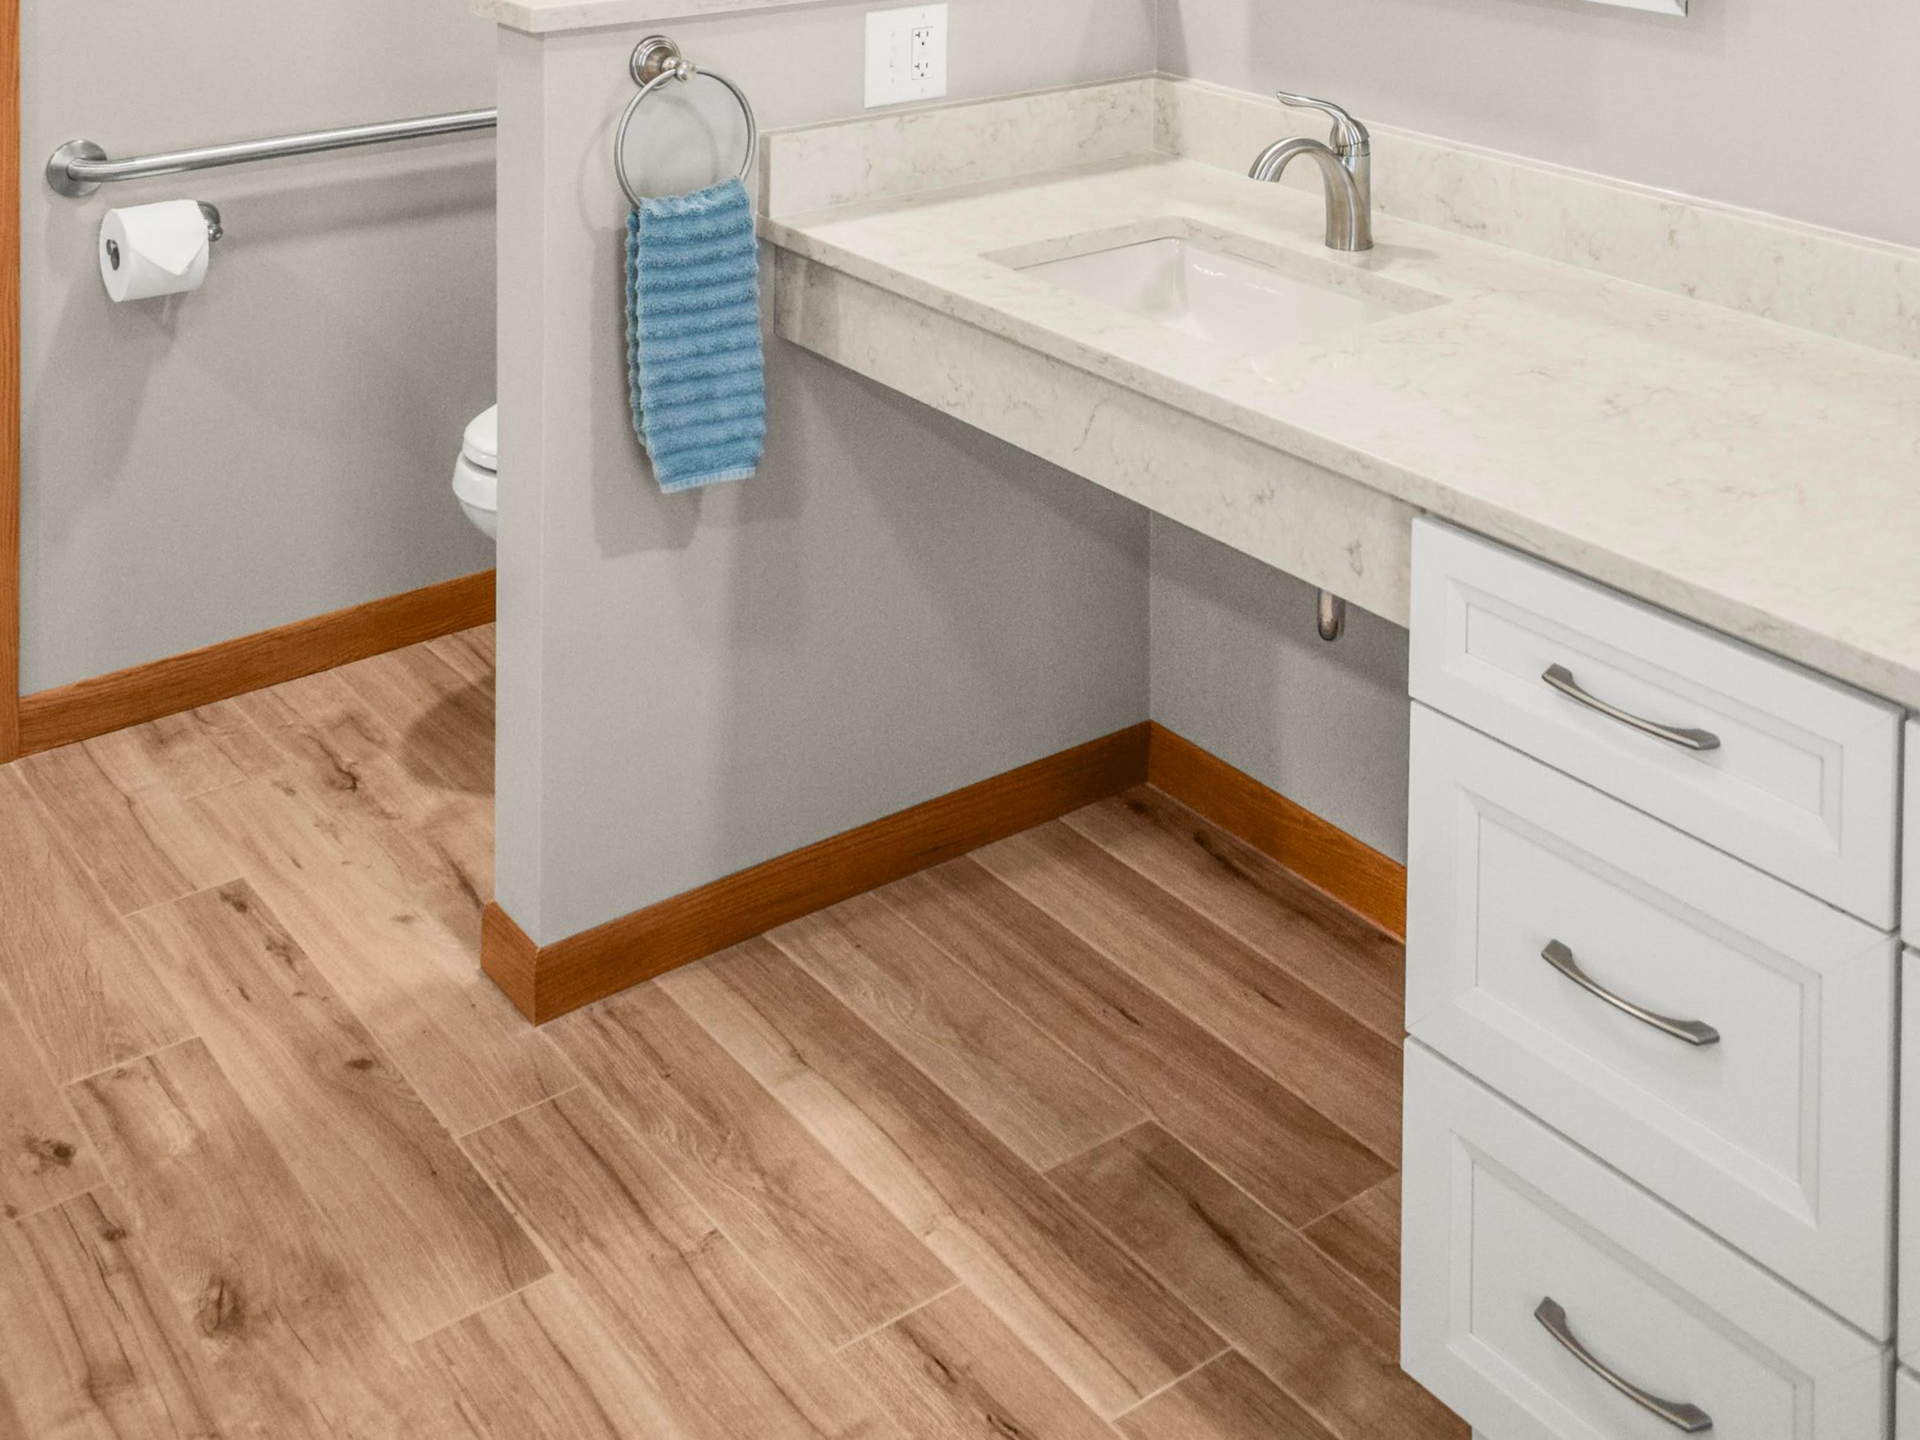
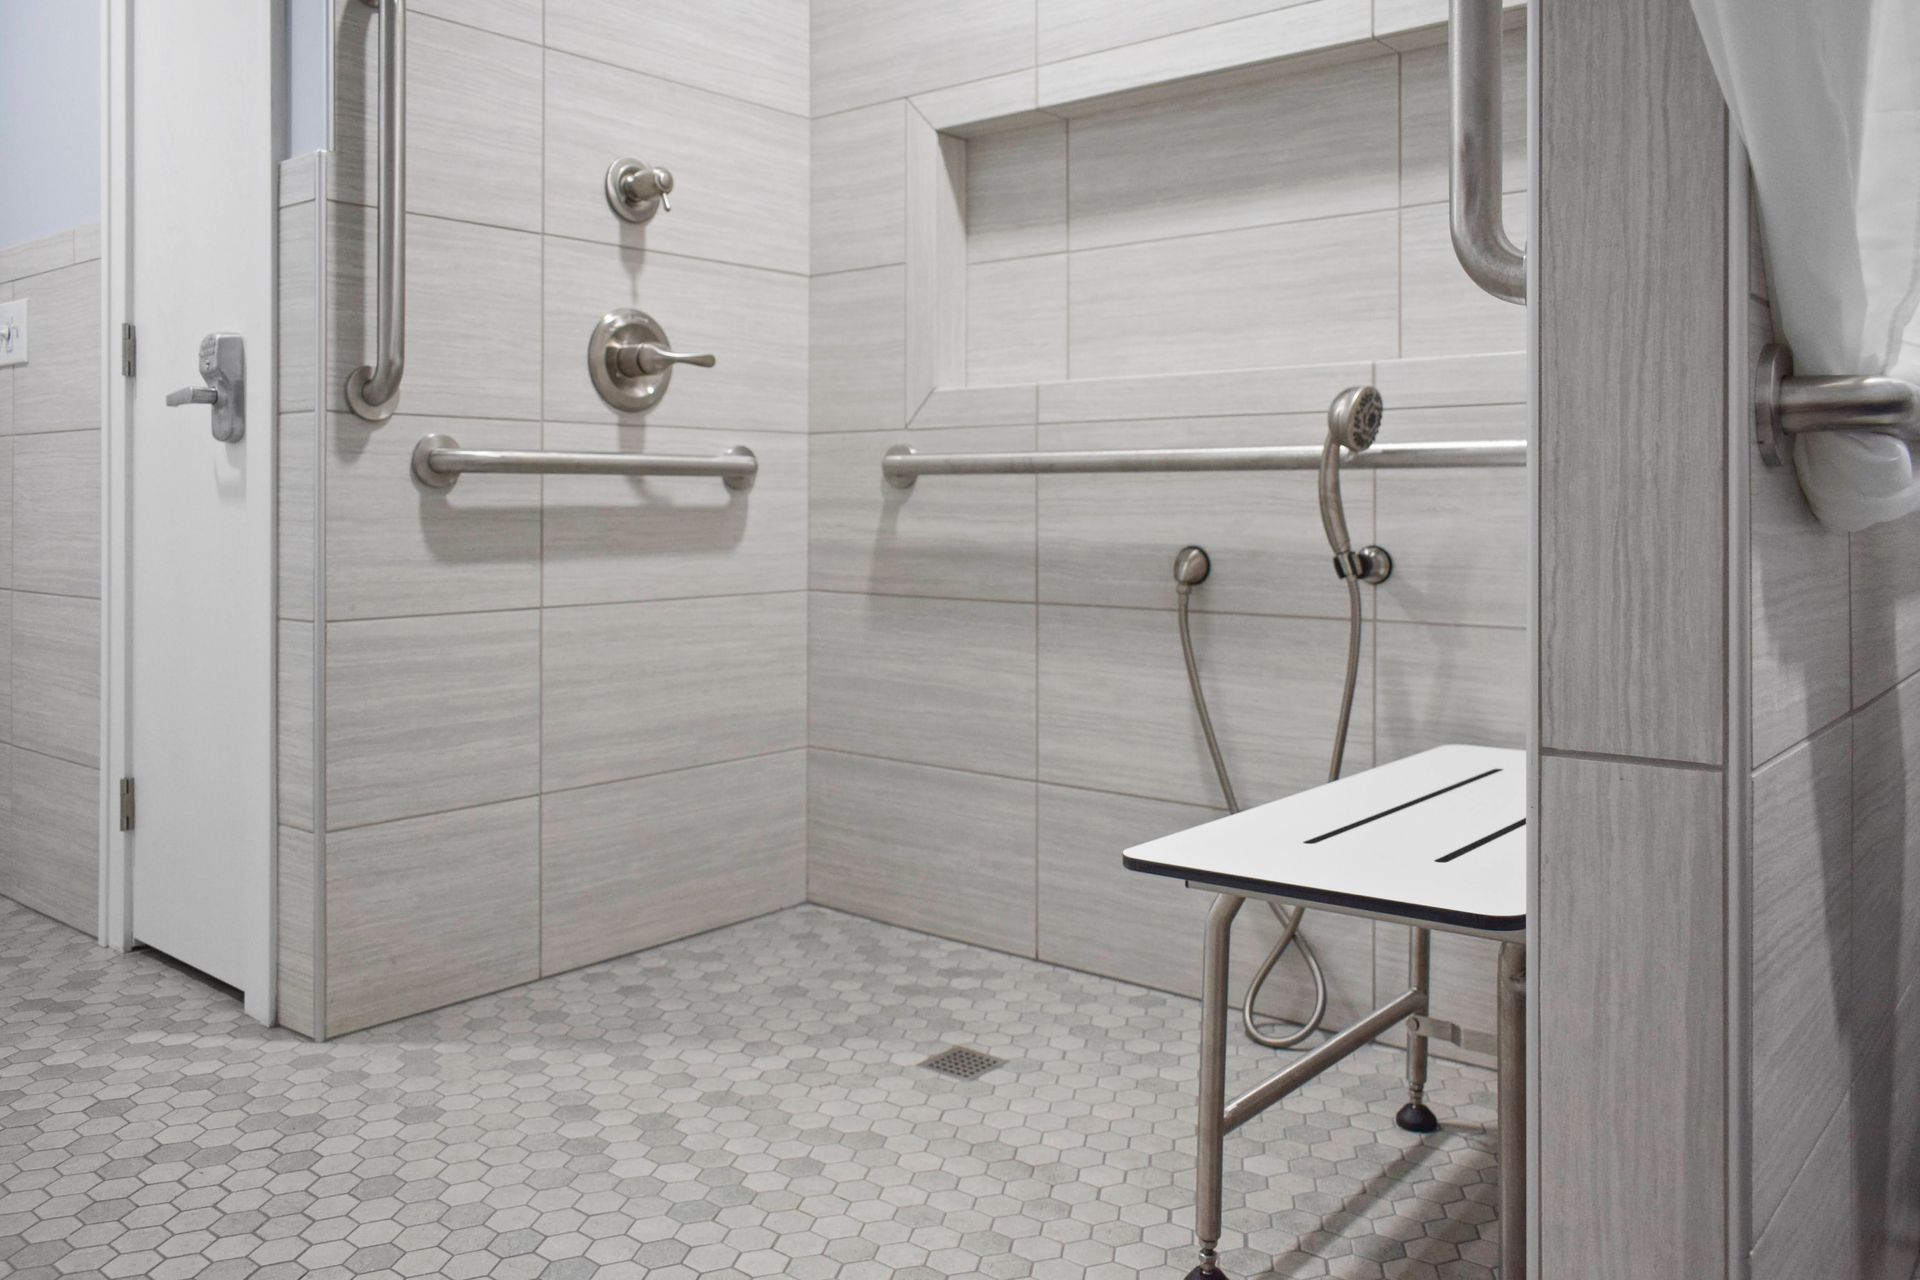
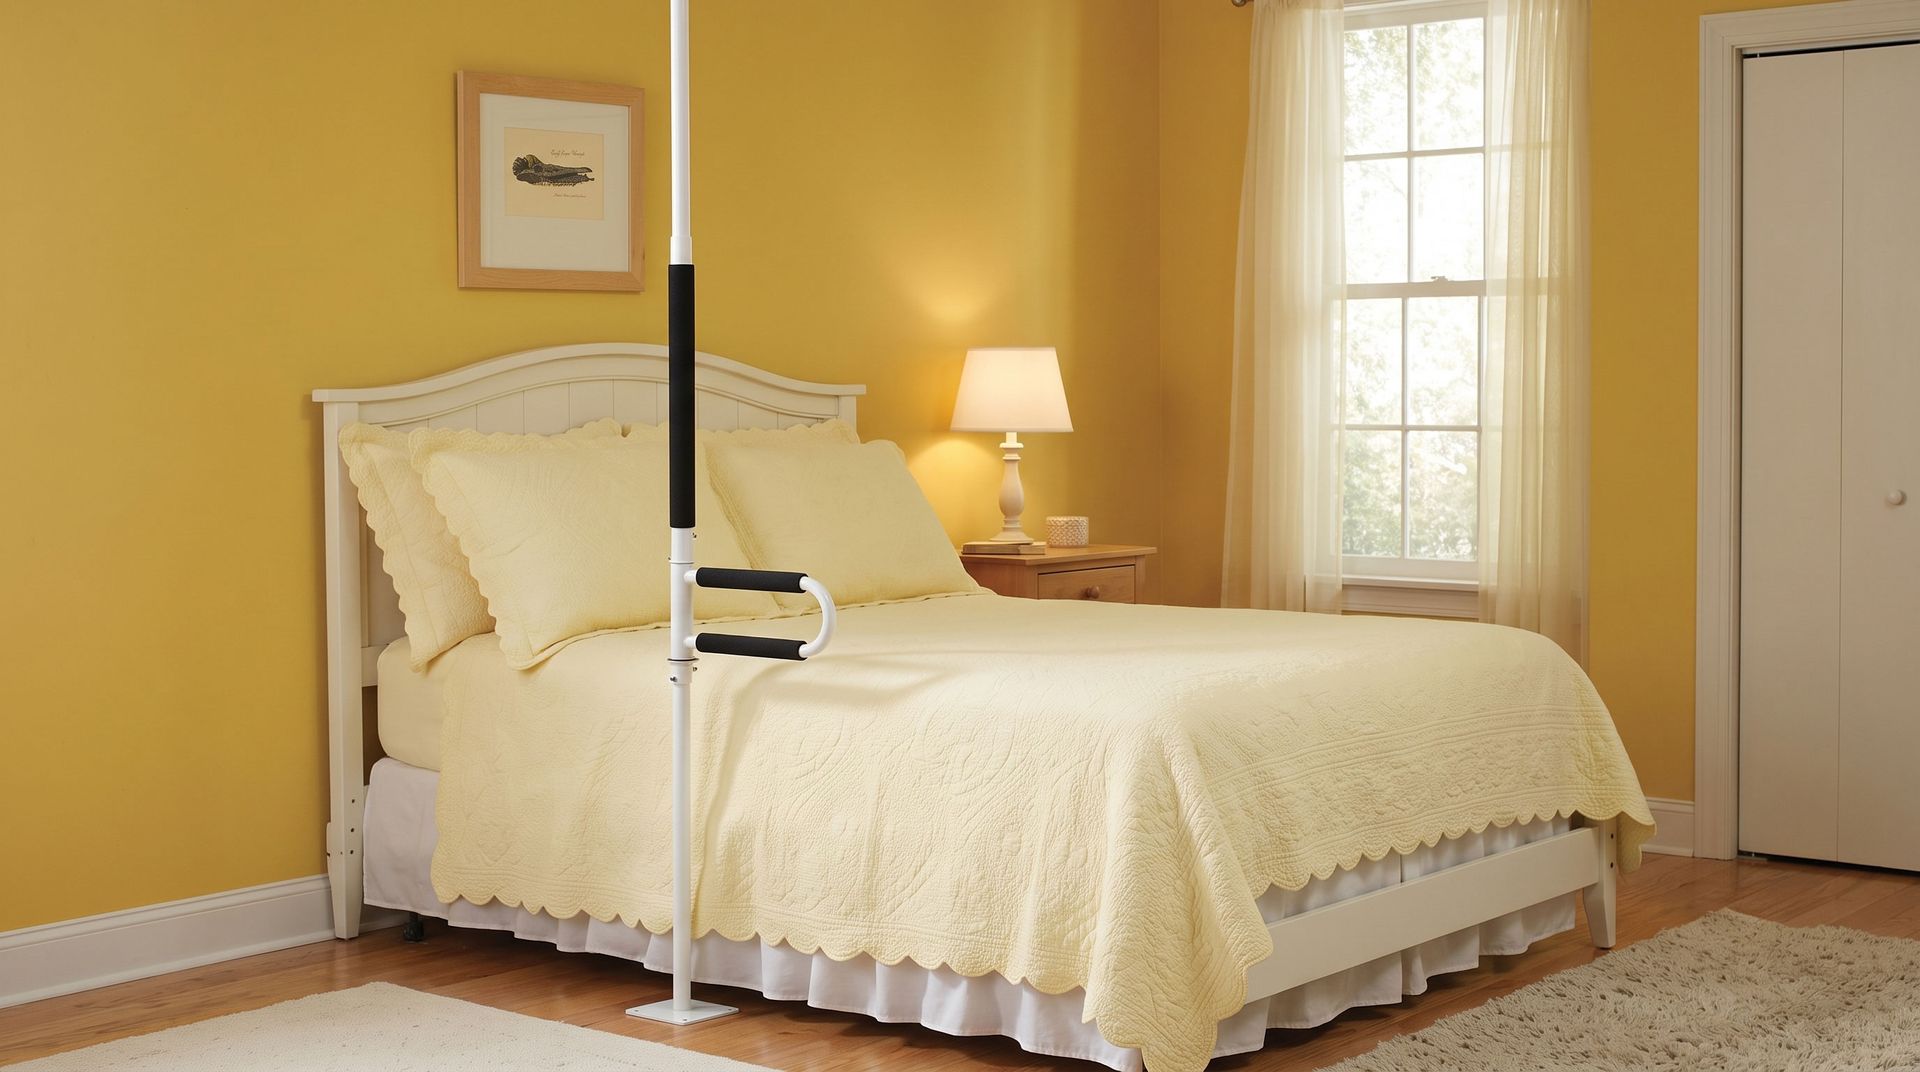
Where should grab bars be installed to improve safety in a group home?

Grab bars help most in places where residents change position or move across wet or unstable surfaces. In toilet areas, bars are usually mounted 33 to 36 inches above the finished floor on the side wall and rear wall to support sitting, standing, and lateral transfers. In showers and tubs, vertical bars at the entrance and horizontal bars on the control and back walls give steady support while stepping in, standing, or using a shower chair. Beyond bathrooms, bars beside beds, along long hallways, near favorite chairs, and at short interior steps give residents extra stability. All bars should be anchored into solid blocking and rated to hold at least 250 to 300 pounds.


Conclusion: Building Safety, Dignity, and Independence

Accessible home design in group homes is not a luxury. It is a basic part of quality care for residents living with a disability, older adults embracing multigenerational living who want to age in place, and veterans who return home with new mobility needs.


By following Universal Design principles and planning the right home modifications, a group home can move from “barely usable” to “supportive and empowering.” Thoughtful remodeling guided by professional audits, staff and resident input, and careful phasing keeps daily life running while key upgrades are completed.


Core safety features like properly sloped wheelchair ramps and structurally anchored grab bars address two of the biggest risks: unsafe entry and exit, and falls during transfers. A 1:12 ramp slope supports safer access for people using a wheelchair or walker. Correctly placed and mounted grab bars reduce fall risk in bathrooms, bedrooms, and common areas.


When these elements come together, the result is more than a building that meets code. It is a safe and functional home that supports independence and dignity, confidence, and choice. Residents gain more control over their daily routines, staff can focus on care rather than constant physical assistance, and families know that their loved ones live in a setting designed for their safety and independence.

Photo of Marius Carlos, Jr.

ABOUT THE AUTHOR

Marius Carlos, Jr. is an SEO strategist and digital marketing professional. He is a freelance copywriter, and his interests in digital marketing include large language models, content, SEO, and social media marketing.


Along with Marius, the Speck Designs’ in-house content team finalizes the blogs. They blend hands-on experience with current standards for SEO, UX, and readability to deliver practical guidance you can trust. Every piece is researched, edited, and written to a high standard.

TALK TO THE EXPERTS OF LAKESHORE BARRIER FREE TODAY!

We believe that everyone should have access to every area of their home! We work directly with you to make sure that every grab bar, bathroom sink, kitchen countertop, patient lift, and more is at the perfect location for you and your loved ones. Call us at (616) 477-2685 or email us at Info@LakeshoreBarrierFree.com

Share this blog

Kitchen renovation: black base cabinets, cream upper cabinets, bare walls, countertop, and window.
By LBF Team December 9, 2025
Explore a team approach to disability and home modifications for veterans, therapists, and wheelchair users that builds safe, well-planned living.
Man in wheelchair in kitchen, reaching for items in a lower cabinet.
By LBF Team November 19, 2025
Get Kitchen Independence with 10 smart ways to create a wheelchair accessible kitchen, from clear paths and roll-under sinks to easy storage and safer cooking.
Person's hands working on blueprints with a pencil, alongside a keyboard, calculator, hardhat, and model houses.
By LBF Team November 12, 2025
Barrier-free living with reimagined doorways, storage, and controls. Michigan veterans lead home modifications for disability and wheelchair access.
Older Black man in wheelchair using smartphone at desk with laptop and plants in home.
By LBF Team October 1, 2025
An accessible space helps people move with ease and feel better overall. Simple changes in the home can make everyday life safer and more enjoyable.